
DSCS9 Android 6.0.1 to Android 7.1.2 Upgrade Instructions - USB Cable
- Xibo for Android
- DSDevices DSCS9X/95 Set-up Guide
- Install a White Label or a different Player version on DSDevices
- CEC Screen Power on/off with DSDevices
- Hardware Recommendations
- Philips Signage SoC Monitors
- Sony Bravia SoC
- Managing Storage on the Android Device
- Player Settings
- Players without an Internet Connection
- Remote Administration with SS Helper
- Restart Rooted Device with a Shell Command
- Running Xibo for Android
- Resolving Common Issues
- Error shown when I try to licence my Player?
- Player not updating from the CMS?
- I can see my Licence entry but the Player appears unlicensed?
- Error message - Player is missing dependencies
- My scheduled Layouts are not working?
- Layout won't play? Splash screen plays?
- Watchdog error message
- Troubleshooting for Administrators
- Audit Trail
- Log Information
- Player Logs
- Getting the Player Status
- Request Player Status via CMS - Logged in Players only
- Request Player Status directly from a Device
- Can I use the Xibo name / logo?
- Can I run a Xibo Player on Raspberry Pi?
- How can I increase the upload file size limit?
- How do Players communicate with the CMS?
- How many displays can Xibo support?
- How do I reset the Xibo_admin account password?
- Power On/Off for Players
- Testing with Xibo
- Why do I need a Default Layout?
- Xibo for Android FAQ's
- Autoplaying Embedded Youtube Videos
- Closing to Home screen
- Displaying Images
- Embedded TV
- External SD card not listed when running Banana-Pi
- Helper Command to change Time zone
- HTML5 Video
- Memory Notifications
- Menu not accessible
- SSL Support
- Using Portrait Displays
- Video wont play properly
DSCS9 Android 6.0.1 to Android 7.1.2 Upgrade Instructions - USB Cable

Check your DSCS9 is compatible
All DSCS9s purchased via Xibo Signage can be upgraded.
A small number of DSCS9s sold several years ago are not compatible with Android 7. To check your device, look at the device with the STATUS and NET LED lights towards you, and the antenna for the wifi on the far side away from you and to the right.
If the two USB-A ports are to the right as you look at it, the device can be upgraded to Android 7. If they’re on the left then unfortunately the device cannot be upgraded to Android 7. Do not try to upgrade a device with USB ports on the left.
Prerequisites
As far as Xibo is concerned, there’s no need to backup any information from the device as everything is pushed down from the CMS in normal operation. If however you have static IP addresses or custom proxy configurations or similar, make a note of those as you will need to reapply those manually after the new firmware has been flashed.
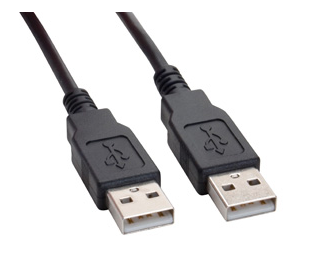
You will need a Windows 10 PC with a USB A port, and a USB A to A cable. These are relatively unusual so may be something you need to purchase specially for the job.
You will need a wooden or plastic stick that will easily fit inside the AV port on the rear of the DSCS9. A matchstick, cocktail stick or toothpick is ideal. Do not use anything metal or anything conductive.
You will need a USB mouse.
You will need to download the USB Burning Tool and DSCS9 Android 7.1 Firmware linked below:
USB Burning Tool DSCS9 Firmware Android 7 20210804-W
Your DSCS9 should be powered off. The mains power adapter should be connected to a power source, but not plugged in to the DSCS9. A monitor should be connected to the DSCS9 via the HDMI port and the monitor should be powered on.
Install USB Burning Tool
If you’re upgrading multiple DSCS9s to Android 7, then you only need to install the USB Burning Tool once.
On your Windows 10 computer, unzip the USB Burning Tool zip file, and run setup_v2.0.8.exe. Proceed through the installer until completion. USB drivers for the DSCS9 will be installed as part of that setup process.
Unzip Firmware
On your Windows 10 computer, unzip the firmware zip file to a temporary directory. You should have an img file and an ini file.
Run USB Burning Tool
Once the USB Burning Tool has installed, run it from the Start Menu.
Initially the tool will load with its user interface in Chinese. To change the user interface to English, click the second menu item from the left at the top of the screen, and choose English.

Next from the top File menu, choose Import.
Select the img file you unzipped earlier.
After a short time, the import will complete and you’ll see the firmware loaded at the bottom of the screen:

Next ensure that the Configuration section to the top right looks like this:
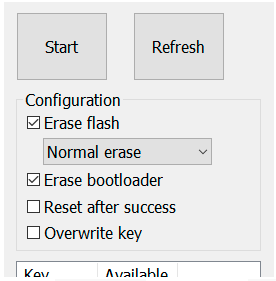
Ensure Erase flash mode is set to Normal erase as shown above. Under no circumstances use any other mode.
Connect DSCS9
Ensure that the DSCS9 is turned off and that the power adapter is disconnected from the power port on the rear of the DSCS9.
Plug one end of the USB A-A cable in to the rear-most USB port of the DSCS9 (nearest to the antenna) and the other in to a spare USB port on your Windows 10 computer.
Put your matchstick or similar in to the AV port on the rear of the DSCS9 and press gently. You should feel a tactile “click” as you depress the reset button.
Keep the reset button pressed as you connect the power adapter to the DSCS9.
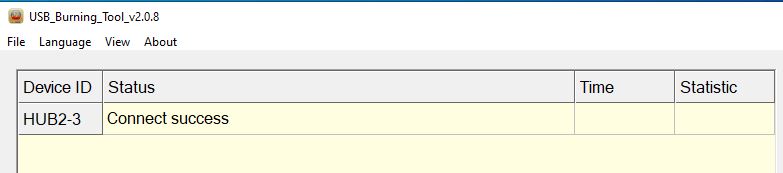
Nothing will be shown on the monitor attached to the DSCS9, but you should see a new device appear in the USB Burning Tool.
If it doesn’t appear, remove the power and USB cables, reconnect the USB and then try the process of pressing the reset button and connecting power again.
Once you have the device connected, click on the Start button at the top right of the USB Burning Tool. Immediately the device will start to be upgraded.
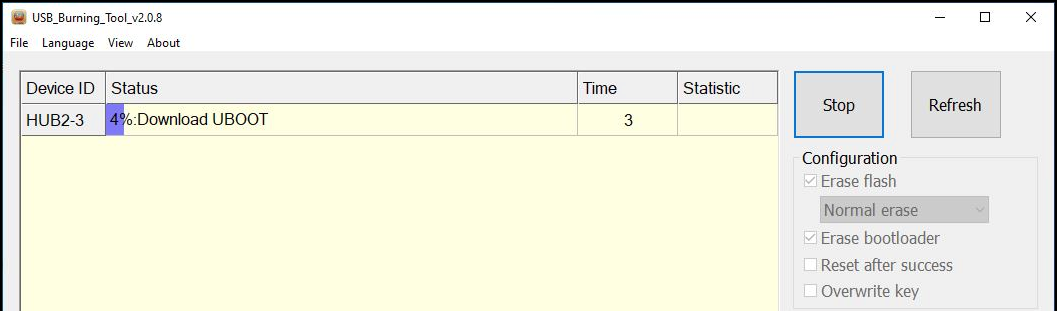
Allow the process to complete. When it has completed, you’ll see the following:

Allow 5-10 seconds for any transfers that are in progress to complete, and then remove the USB cable from the DSCS9.
If you’re doing multiple DSCS9s, you can connect the next one at this point and it will automatically upgrade as soon as it is connected.
When you’ve finished upgrading devices, ensure the USB and power cables are disconnected from the DSCS9 and then click the Stop button. You can now close the USB Burning Tool.
Configuring the DSCS9
The DSCS9 is now upgraded to Android 7.1. Reconnect it to power, screen and a mouse.
The DSCS9 will boot up as normal in to a fresh installation of Android. We need to do the initial configuration we would for any new Android device.
Connect the DSCS9 to the network (wifi details or plug in the LAN cable). Setup the correct locale/regional settings, timezone and ensure that the date and time are set correctly.
Xibo for Android is pre-installed for you. If you’re using a white labelled version of Xibo for Android, you’ll need to uninstall Xibo for Android and install your white label build instead at this point. For more information, please see this guide here.
If you have any management tools such as Webkey or TeamViewer, now is the time to reinstate those.
Once you’re ready to run Xibo again, launch the Xibo Player.
We now need to reconnect the Player to your CMS. Either enter the CMS Address and CMS Key for your CMS, or use the “Use Code” button for a quicker connection.
Once the Player has connected to the CMS, you’ll see a new Display appear in your CMS, likely called DSCS9-DSCS9.

If you’re attaching the Player to a new CMS, then edit the display, authorise it and perform your normal display setup routine.
If you’re reattaching a Player to a CMS after the Android 7.1 upgrade, then you can use the existing Display record to avoid recreating schedules, display group memberships etc.
Edit the new DSCS9-DSCS9 display and copy the Display's Hardware Key value:
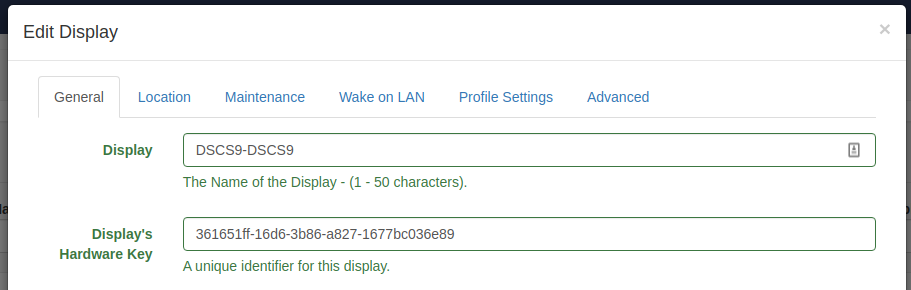
Click cancel and then delete the new Display from the CMS.
Now edit the Display’s original entry and paste the Hardware Key you copied earlier overwriting the one that is there already.
Move to the Advanced tab and tick the Reconfigure XMR box, and then save your changes.
The display will now download any content and begin showing content as normal.
Configuration Changes
DSCS9 devices running Android 7 should have the Use a SurfaceView for Video Rendering? set to On. You can either set this in the Display Settings Profile for your Android devices if they’ll all be running Android 7.
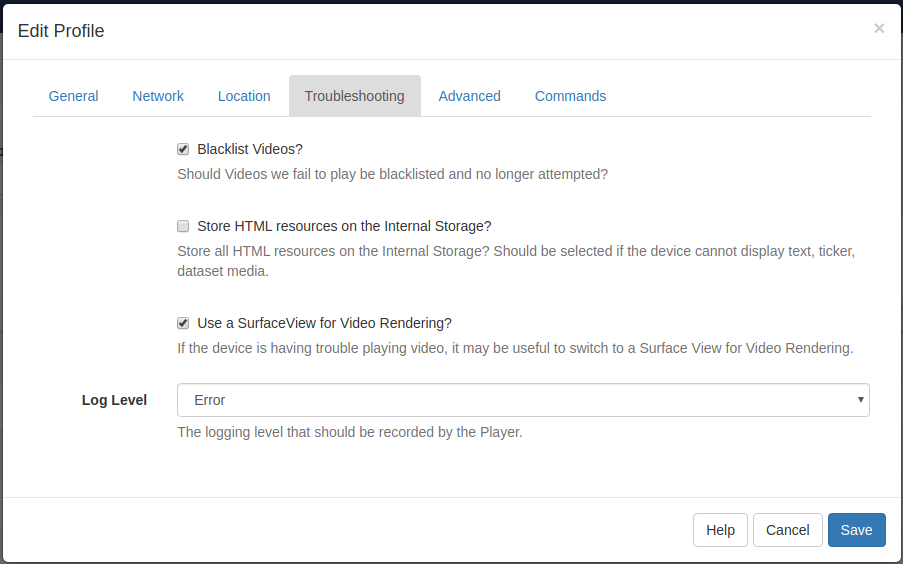
Alternatively you can override the setting for an individual device by editing the Display from the Displays page, and on the Profile Settings tab changing the setting there and then saving.

Earlier Firmware Revisions
DSCS9-Android-7.1-20200428 (standard on devices shipped May 2020 - 17th August 2021) DSCS9-Android-7.1-20210510-W
We recommend the current version above.
Downgrading from Android 7.1.2 to Android 6.0.1
If you want to downgrade from Android 7 to 6 then you can do so by following the instructions above, substituting the Android 7 firmware for Android 6 firmware.
You can download the Android 6 firmware for the DSCS9 here:
Again this firmware is only suitable for devices with their USB ports on the right hand side (see prerequisites above).
