
On-Premise Licensing Module
On this page
On-Premise Licensing
Player Licences must be verified every 30 days. Devices that fail to get a licence will automatically stop downloading new content from the Xibo CMS it is connected to.
This module acts as a pass-through to our licensing servers for Players that will not have reliable internet access, or that will run permanently disconnected from the internet.
First steps
-
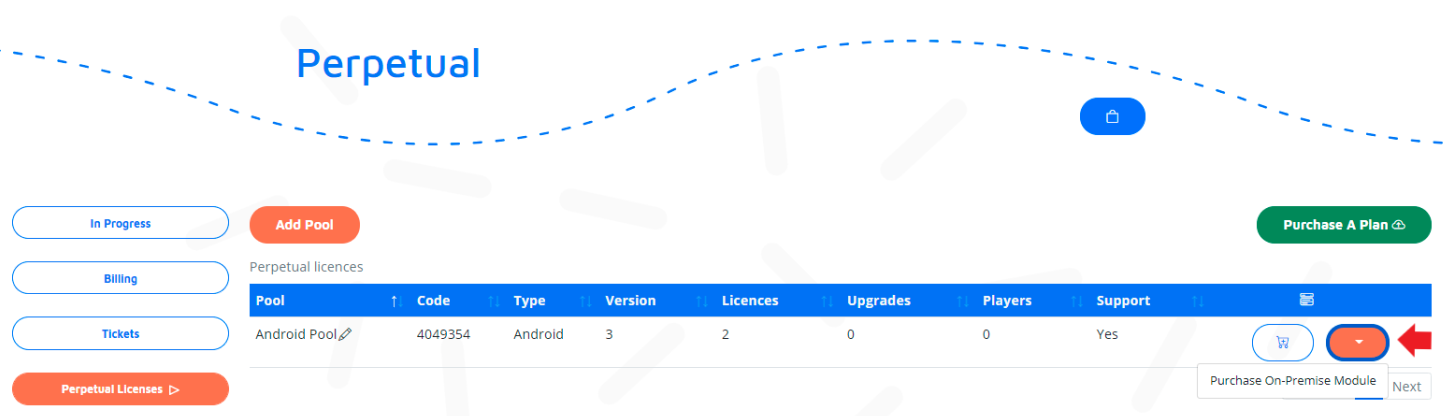
From My Account navigate to Pepetual Licences.
-
Click the end button for the Licence Pool to Purchase On-Premise Module.
Once purchased follow the steps below:
Download and Install to your CMS
From My Account, navigate to the Licence Pool which now has the On-Premise Module now enabled.

Use the row menu and download by clicking on Download Module and select the correct folder for the version/Player required from the downloaded zip. Install on your server as per the instructions for your Player as detailed below:
CMS Docker Install 1.8 / 2.x / 3.x /4.x and later - Xibo for Android
Open the correct folder from the downloaded zip file, and then copy the contents of the folder into your shared/cms/custom folder.
Edit shared/cms/custom/settings-custom.php file, and add the following lines to the end of the file, before the closing ?> tag, so that it looks like this:
$androidOnPremise = new \Xibo\Custom\XiboForAndroidOnPremise();
$androidOnPremise->setConfig('licences@example.org');
$middleware = [$androidOnPremise];
?>
Be sure to replace licences@example.org with your correct Licence Pool email address.
If you already have other middleware enabled, please see the comments at the top of the XiboForAndroidOnPremise.php file which explains how to handle that.
Finally, run a manual licence check from the Player. It won’t licence the Player initially but a file - request.txt should be created on in the shared/cms/library/android folder.
CMS Custom Install 1.8 / 2.x / 3.x / 4.x and later - Xibo for Android
Open the correct folder from the downloaded zip file, and then copy the contents of the folder into your shared/cms/custom folder.
Edit /web/settings.php file, and add the following lines to the end of the file, before the closing ?> tag, so that it looks like this:
$androidOnPremise = new \Xibo\Custom\XiboForAndroidOnPremise();
$androidOnPremise->setConfig('licences@example.org');
$middleware = [$androidOnPremise];
?>
Be sure to replace licences@example.org with your correct licence pool email address.
If you already have other middleware enabled, please see the comments at the top of the XiboForAndroidOnPremise.php file which explains how to handle that.
Finally, run a manual licence check from the Player. It won’t licence the Player initially but a file - request.txt should be created on in the /library/android folder.
Xibo for Android Version 1.7 and earlier CMS instances
Open the correct folder from the downloaded zip file and the copy into your Xibo installation directory on the CMS (to the directory where xmds.php file is).
You need to ensure your web server can create a file called request.txt in the server installation directory. We provide a .htaccess file to prevent that file from being accessed from the web server. If you aren’t using Apache then you may need to make alternative provision for that.
Once the offline licence files are in place, you need to edit the android_config.php file and set the correct licence pool address for your server. Again that would be the email address you nominated earlier. The other options should all be correct already for you.
Finally, run a manual licence check from the Player. It won’t licence the Player initially but a file - request.txt should be created on the CMS.
In summary:
- Select the correct folder from the downloaded zip file and put them in your CMS installation folder
- Ensure that the web server can write into that folder
- Edit
android_config.phpand set your licence pool email address - Run a licence check and see the
request.txtfile generated in the CMS installation folder
CMS Docker Install 1.8 / 2.x / 3.x / 4.x and later - Xibo for webOS
Open the correct folder from the downloaded zip file, and then copy the contents of the folder into your shared/cms/custom folder.
Edit shared/cms/custom/settings-custom.php file, and add the following lines to the end of the file, before the closing ?> tag, so that it looks like this:
$webOSOnPremise = new \Xibo\Custom\XiboForWebosOnPremise();
$webOSOnPremise->setConfig('licences@example.org');
$middleware = [$webOSOnPremise];
?>
Be sure to replace licences@example.org with your correct Licence Pool email address.
If you already have other middleware enabled, please see the comments at the top of the XiboForWebosOnPremise.php file which explains how to handle that.
Finally, run a manual licence check from the Player. It won’t licence the Player initially but a file - request.txt should be created on in the shared/cms/library/webos folder.
CMS Custom Install 1.8 / 2.x / 3.x / 4.x and later - Xibo for webOS
Open the correct folder from the downloaded zip file, and then copy the contents of the folder into your /custom folder.
Edit /web/settings.php file, and add the following lines to the end of the file, before the closing ?> tag, so that it looks like this:
$webOSOnPremise = new \Xibo\Custom\XiboForWebosOnPremise();
$webOSOnPremise->setConfig('licences@example.org');
$middleware = [$webOSOnPremise];
?>
Be sure to replace licences@example.org with your correct Licence Pool email address.
If you already have other middleware enabled, please see the comments at the top of the XiboForWebosOnPremise.php file which explains how to handle that.
Finally, run a manual licence check from the Player. It won’t licence the Player initially but a file - request.txt should be created in the /library/webos folder.
CMS Docker Install 1.8 / 2.x / 3.x / 4.x and later - Xibo for Tizen
Open the correct folder from the downloaded zip file, and then copy the contents of the folder into your shared/cms/custom folder..
Edit shared/cms/custom/settings-custom.php file, and add the following lines to the end of the file, before the closing ?> tag, so that it looks like this:
$TizenOnPremise = new \Xibo\Custom\XiboForTizenOnPremise();
$TizenOnPremise->setConfig('licences@example.org');
$middleware = [$TizenOnPremise];
?>
Be sure to replace licences@example.org with your correct Licence Pool email address.
If you already have other middleware enabled, please see the comments at the top of the XiboForTizenOnPremise.php file which explains how to handle that.
Finally, run a manual licence check from the Player. It won’t licence the Player initially but a file - request.txt should be created on in the shared/cms/library/tizen folder.
CMS Custom Install 1.8 / 2.x / 3.x / 4.x and later - Xibo for Tizen
Open the correct folder from the downloaded zip file, and then copy the contents of the folder into your /custom folder.
Edit /web/settings.php file, and add the following lines to the end of the file, before the closing ?> tag, so that it looks like this:
$TizenOnPremise = new \Xibo\Custom\XiboForTizenOnPremise();
$TizenOnPremise->setConfig('licences@example.org');
$middleware = [$TizenOnPremise];
?>
Be sure to replace licences@example.org with your correct Licence Pool email address.
If you already have other middleware enabled, please see the comments at the top of the XiboForTizenOnPremise.php file which explains how to handle that.
Finally, run a manual licence check from the Player. It won’t licence the Player initially but a file - request.txt should be created in the /library/tizen folder.
Install your Players
Download and install the Player application onto your devices and set the appropriate Licence Pool code in the Player settings.
Please Note: During this configuration, if the Player has access and connects to our licence servers it will automatically licence directly from us, so you need to ensure your Players don’t have any access to the internet unless you are using the “shortcut” method outlined below. To do this, you can simply forget any defined wireless networks in the Player’s wifi device manager, or remove the ethernet cable or mobile SIM card. Please do ensure that the wifi adapter in your device is enabled.
Upload and Download Licence files
Once you have all the Players you want to licence in the request.txt file, you need to upload that file into My Account for your Licence Pool, using the row menu and selecting Upload Licence:

Once uploaded you need to download the android.txt / webos.txt / tizen.txt file by clicking Download Licence:

Copy to your CMS
When you have your android.txt / webos.txt / tizen.txt file you’ll need to copy it to your CMS.
Xibo for Android 1.8 / 2.0 / 3.0 / 4.0 and later
Place the android.txt file in the CMS library directory, in the android folder. By default on a Docker install, that would be shared/cms/library/android, and for a custom install, /library/android.
Xibo for Android 1.7 and earlier
Place the android.txt file in the Xibo installation directory on the CMS (to the directory where xmds.php file is).
Xibo for webOS 1.8 / 2.0 / 3.0 / 4.0 and later Place the webos.txt file in the CMS library directory, in the webos folder. By default on a Docker install, that would be shared/cms/library/webos, and for a custom install, /library/webos.
Xibo for Tizen 1.8.13 / 2.0 / 3.0 / 4.0 and later Place the tizen.txt file in the CMS library directory, in the tizen folder. By default on a Docker install, that would be shared/cms/library/tizen, and for a custom install, /library/tizen.
Shortcut Method
If you are able to setup Players somewhere where they have internet access before taking them to their final location then follow this shortcut method. This process will initially licence directly with the licence service and then with the CMS after they are physically moved to their final site, without the need for a request.txt file.
Licence your device online as normal to get it registered with My Account, then click on your Licence Pool with On-Premise enabled. Use the row menu and then select Licence Download to download the android.txt / webos.txt / tizen.txt file for you.
Then at your destination site (where there’s no internet access), copy your downloaded file.
Next, you will need to copy it to your CMS as previously mentioned above.
