Tizen Installation Guide
- Xibo for Android
- DSDevices DSCS9X/95 Set-up Guide
- Install a White Label or a different Player version on DSDevices
- CEC Screen Power on/off with DSDevices
- Hardware Recommendations
- Philips Signage SoC Monitors
- Sony Bravia SoC
- Managing Storage on the Android Device
- Player Settings
- Players without an Internet Connection
- Remote Administration with SS Helper
- Restart Rooted Device with a Shell Command
- Running Xibo for Android
- Resolving Common Issues
- Error shown when I try to licence my Player?
- Player not updating from the CMS?
- I can see my Licence entry but the Player appears unlicensed?
- Error message - Player is missing dependencies
- My scheduled Layouts are not working?
- Layout won't play? Splash screen plays?
- Watchdog error message
- Troubleshooting for Administrators
- Audit Trail
- Log Information
- Player Logs
- Getting the Player Status
- Request Player Status via CMS - Logged in Players only
- Request Player Status directly from a Device
- Can I use the Xibo name / logo?
- Can I run a Xibo Player on Raspberry Pi?
- How can I increase the upload file size limit?
- How do Players communicate with the CMS?
- How many displays can Xibo support?
- How do I reset the Xibo_admin account password?
- Power On/Off for Players
- Testing with Xibo
- Why do I need a Default Layout?
- Xibo for Android FAQ's
- Autoplaying Embedded Youtube Videos
- Closing to Home screen
- Displaying Images
- Embedded TV
- External SD card not listed when running Banana-Pi
- Helper Command to change Time zone
- HTML5 Video
- Memory Notifications
- Menu not accessible
- SSL Support
- Using Portrait Displays
- Video wont play properly
Tizen Installation Guide
Xibo for Tizen is easy to install and configure and can be up and running in just a few minutes.
Before you begin the installation process, you should first make sure you have fulfilled the minimum requirements below:
Minimum Requirements:
- Xibo CMS version 1.8.13 or later.
- Your monitor must be listed as a supported model, please check compatibility here
- Xibo for Tizen software licence required if not on a Plan.
Please note: The use of Xibo for Tizen can be included in all Plans for an additional surcharge with no separate licensing requirement. The required Licence information field is completed automatically to connect the Player to the CMS.
Customers with Independent Pricing not on a plan are required to purchase a Xibo for Tizen software Licence for each device you intend to run which is then linked to a Licence Pool.

You should also check that you are using the recommended Firmware Version for your Series and Model, please refer to our Tizen Firmware Matrix and Firmware Guide.
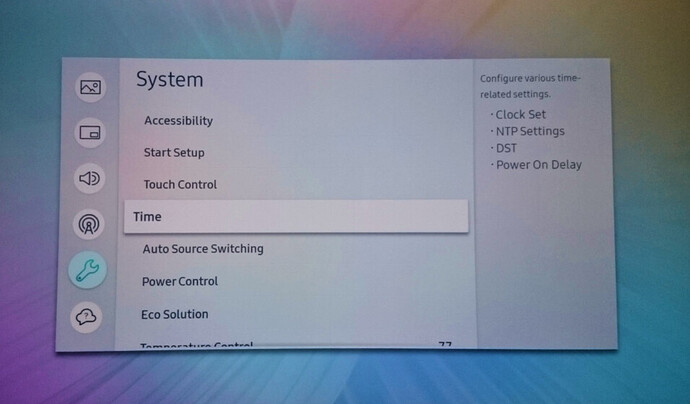
Prepare your monitor
- Use the Menu button on your remote control to access the System Menu.
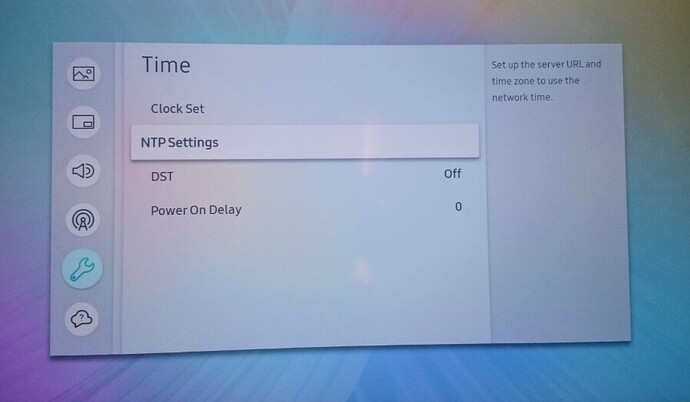
- Select Time:
You can choose to manually set the time using the Clock Set option or you can go to NTP Settings to configure an NTP Server for automatic time settings. Please note that you will find the time zone settings in the NTP Settings menu.
You can now proceed with the player installation steps!
Download the latest Xibo for Tizen Player from here
Install the Xibo for Tizen WGT
There are two methods for installing the player:
- Remotely via the CMS
or
- Locally using a USB device.
Install Remotely via CMS
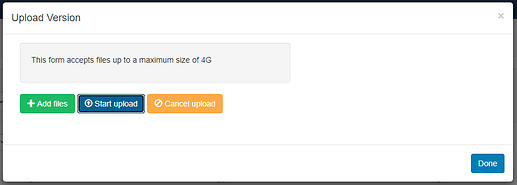
- Navigate to Player Versions under the Displays section of the CMS main menu.

- Select the Add Version button.
- Click Add files and select the downloaded WGT Player file.
- Select the Start upload button to upload the file to your CMS.
- When the upload is complete, click Done to close the window.
- Next, navigate to Display Settings from the CMS main menu.
- Use the row menu for the default Tizen profile and select Edit from the list.
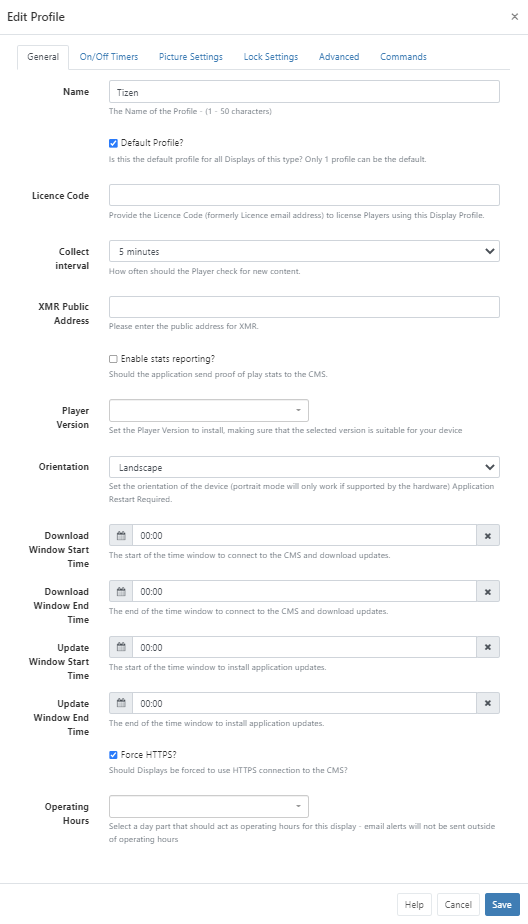
- Enter the Licence Code that you wish to use for this Player
- Click on the Player Version field and choose the player that you uploaded previously.
- When you have finished configuring your default Tizen profile, click Save to confirm.
Connect your Samsung display to your CMS.
After completing the steps above, click the Home button on your remote control and select URL Launcher Settings from the bottom menu:
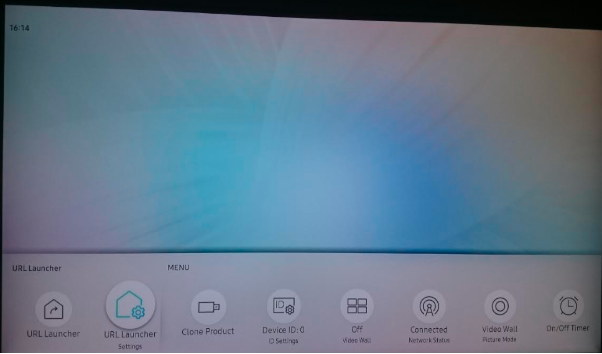
- Select the Install Web App option and enter the URL for your CMS installation. For example
https://cms.example.org or http://example.org/cms
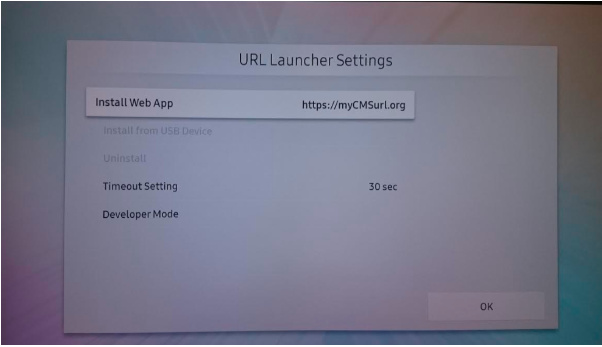
- Click Done to confirm.
The Player will open automatically once installed. Proceed to the Configure your player section below.
Install locally via USB
When installing Xibo for Tizen, you will need to prepare your USB:
- Create a folder at the root directory of your USB device and name it
SSSP. - Save the Xibo for Tizen player you downloaded earlier inside the
SSSPfolder and rename itsssp_dl.wgt. - Next you will need to create a configuration file for the player using a text editor, for example Notepad . Please copy the below text into that file:
<?xml version="1.0" encoding="UTF-8"?>
<widget>
	<ver></ver>
	<size>9999999</size>
	<widgetname>sssp_dl</widgetname>
	<webtype>tizen</webtype>
</widget>
- You will need to enter the version of the player you wish to install between the
<ver>and</ver>brackets to complete the configuration file. For example, if you have downloaded the version 2 R201 player, you will need to enter2.201between those brackets. - Once the configuration file is complete, save it as a
sssp_config.xmland copy it to theSSSPfolder.
Install the player
- Now that you have set up the USB, press the Home button on your remote control and go to the URL Launcher Settings menu.
- Choose Install from USB Device to start the installation.
Once you receive confirmation that the application is installed, proceed with the Configure your player section below.
Configure your player
Open your player by pressing the Home button on your remote control, then select the Xibo player from the menu at the bottom of the screen.
This will open the Connect to your CMS page.
- CMS URL: The address for your CMS.
- CMS Key: The secret CMS Key that will authenticate this Display with the CMS.
- Email Address: The email address/ Licence Pool Code to use.
When you have entered the information for your CMS, press the Connect CMS button to confirm your settings.
Activate your Licence

- As you have provided a Licence Pool Code in the Tizen Display Setting Profile in the CMS, Xibo will start immediately and download its content from the CMS.
- If you have not provided a Licence Pool, a trial period will begin.
Your player will require a licence before the end of its trial period, or it will no longer receive scheduled events and media.
Display Setting Profiles
Default Profiles have been provided for you.
For more information on available settings, please see Tizen Display Profile Settings.
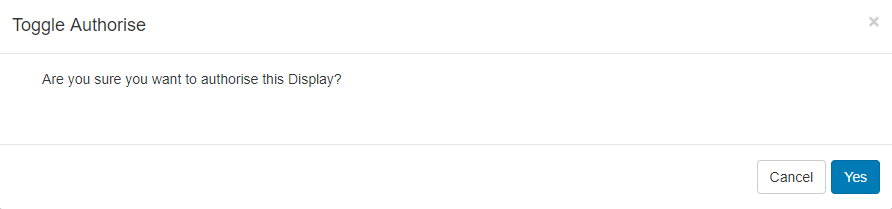
Display Authorisation
Before the Player can receive Scheduled Events and display Layouts/Campaigns you will need to Authorise the Display to connect to the CMS.
-
Log into your CMS and click on Displays from the main menu to see your newly registered Player in the list.
-
Use the row menu for the new Player and select Authorise from the drop down menu.
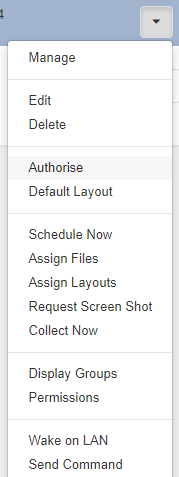
- Click Yes to confirm the authorisation of the Display.