Please note: As Docker on Windows is not recommended we no longer support the updating of information on this page, so please be aware that the following guide may be outdated. We instead recommend installing with Docker on Linux.
Install Docker
There are 2 Docker products for 64 bit Windows, “Docker for Windows” and “Docker Toolbox”. If you have Windows 10 Professional 64 bit, then Docker for Windows is the version of Docker you should install.
You can download the Docker for Windows installer from the Docker website, and follow their guide to getting Docker installed. You should install the latest Stable build of Docker CE (Community Edition). See docs.docker.com - Docker for Windows Install
Docker for Windows comes with Docker Compose, so all the requirements are met installing that single package.
Once Docker is installed, you will need to share the local hard drive on which you will install the Xibo CMS. To do so, find the Docker icon in the Windows system tray, right click on it, and select Settings.
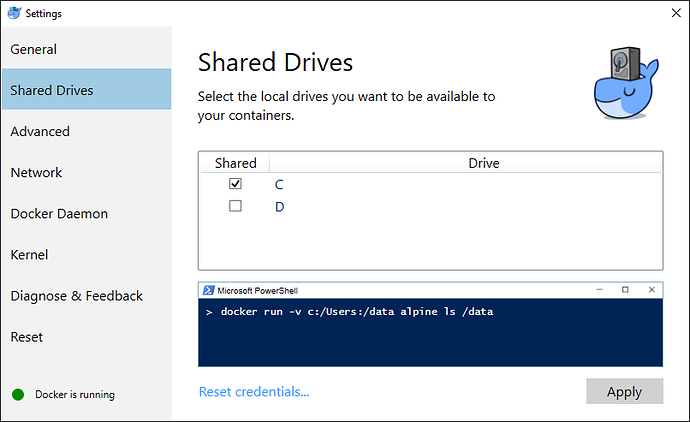
Click on the Shared Drives tab, and then put a tick against the local drive on which you will install the CMS. Click Apply to save your changes.
For the rest of this guide, you will need to use the Windows PowerShell.
Download and extract the Xibo Docker archive
The latest Xibo Docker installation files can be downloaded from here.
The archive should be extracted in a suitable location on your host machine we’d suggest c:\Xibo . Your library content and database will be written under this folder.
Please note that the archive already contains a sub-folder called Xibo-docker, which is ‘best practice’ for archives! For the subsequent instructions please make sure you are inside the sub-folder contained in the archive.
Check and edit configuration
The first time Xibo is installed a configuration file is needed to tell Docker how the environment is configured. This file is called config.env. This file covers where you want files to be stored, email config, etc.
A template file with detailed instructions is provided in the release archive and is called config.env.template. Take a copy of this file, renaming to config.env and then edit the file in a text editor, e.g. notepad, atom, etc.
If you don’t want Xibo to be able to send email messages, then you can omit to configure those options.
Docker will map data folders to contain database data and any custom files for the CMS. These will, by default appear in the folder containing the release archive in a shared sub-folder.
Using different ports
By default, Xibo will start a web server listening on port 80. If you already have a web server listening on port 80 of your host machine, or would prefer to use an alternative port number, then you need to copy the cms_custom-ports.yml.template file and change the ports section for cms-web. The file should be saved as cms_custom-ports.yml.
Similarly, Xibo’s XMR server will be started listening on port 9505. If you would prefer to use an alternative port number, then you’ll need to do so by copying the cms_custom-ports.yml.template file and changing the ports section for cms-xmr .
The ports section of a Docker Compose YML file lists ports in the format <host>:<container> - to move to port 8080 the declaration would be 8080:80.
To use this file replace any docker-compose up -d commands in the below instructions with docker-compose -f cms_custom-ports.yml up -d.
Remote MySQL
The default docker-compose.yml file includes a container for MySQL, however, it is possible to run with an external/remote MySQL instance as the database for Xibo.
To do this base the config.env file on the template config.evn.template-remote-mysql and replace any docker-compose up -d commands in the below instructions with docker-compose -f cms_remote-mysql.yml up -d .
HTTPS/SSL
Xibo should be run over SSL if running on anything other than a secure private network. The Docker containers do not provide SSL and this must be provided by an external web server which handles SSL termination and reverse proxy into the cms-web container.
There are many good resources for achieving this architecture - for example, a nginx-proxy container could be used.
If you already have a web server running on your Host machine, configuring a reverse proxy should be straightforward, an example VirtualHost for Apache is below, it assumes you’ve configured your custom ports for port 8080:
Listen 443

NameVirtualHost *:443
<VirtualHost *:443>

    SSLEngine On
    ProxyPreserveHost On
	RequestHeader set X-Forwarded-Proto "https"

    # Set the path to SSL certificate
    # Usage: SSLCertificateFile /path/to/cert.pem
    SSLCertificateFile /etc/apache2/ssl/file.pem


    # Servers to proxy the connection, or;
    # List of application servers:
    # Usage:
    # ProxyPass / http://[IP Addr.]:[port]/
    # ProxyPassReverse / http://[IP Addr.]:[port]/
    # Example:
    ProxyPass / http://0.0.0.0:8080/
    ProxyPassReverse / http://0.0.0.0:8080/

</VirtualHost>
A worked example for setting up an Apache reverse proxy for SSL with LetsEncrypt SSL certificates can be found here.
Installing the CMS containers
Once you’ve made your changes to config.env and have saved the file, Open a terminal/command window in the folder where you extracted the archive. As a user who has permissions to run the docker command, simply run the following command in PowerShell.
docker-compose up -d
Please note: You may experience a delay whilst the CMS finishes setting up after the command is run, please be patient.
This will bootstrap and start your Xibo CMS. The CMS will be fully installed with the default credentials.
Username: xibo_admin
Password: password
You should log on to the CMS straight away and change the password on that account.
You can log on to the CMS at http://localhost. If you configured an alternative port number then be sure to add that to the URL, for example, http://localhost:8080 .
Configuration adjustments
If you are running a Windows or a 3rd party firewall on your computer you will need to allow the ports you’ve configured the CMS to run on inbound. If you haven’t specifically configured alternative ports, then the following is required:
- Inbound TCP Port 9505 (for XMR Push Messaging)
- Inbound TCP Port 80 (for HTTP Traffic) AND/OR
- Inbound TCP Port 443 (for HTTPS Traffic - if you are using SSL)
Configuration of XMR public address
Docker cannot reasonably know the DNS name or IP address of your host machine, and therefore it is necessary to configure the XMR Public Address in CMS Settings when first logged in.
This only needs to be done on the first bootstrap.
This can be found by navigating to the Settings page under the Administration section of the Menu and selecting the ‘Displays’ tab.
The format of the address is:
tcp://<ip_address>:<port>
The default <port> is 9505 and should be set to that unless you have specified a custom port in your docker-compose configuration.
Starting and Stopping Xibo
Once the CMS containers have been initialised with docker-compose up -d, it is possible to start and stop them without removing the underlying container.
The stop command will stop the Xibo CMS services running. If you want to start them up again, issue the start command.
docker-compose stop
docker-compose start
Uninstalling / removing
The CMS installation and its associated containers can be completely removed by issuing the down command.
Before running docker-compose down, please be sure that your media and database files are being correctly written to the shared directory. To do so, upload for example an image in to the CMS, and check that the same image appears in the shared/cms/library directory. Another good check is to make sure that shared/backup/db/latest.tar.gz was created within the last 24 hours. If either of those checks fail, please do not run docker-compose down as this will lead to data loss. Seek support to resolve the situation.
If your intention is to remove all traces of Xibo you may delete the c:\Xibo folder after running the down command.
docker-compose down
Special considerations
At the time of writing, there is a bug with Docker for Windows which means that when your Windows computer is restarted, the CMS will appear to lose all your Media, Layouts and Configuration.
Your content is safe! Until this issue is resolved, after a reboot, you will need to manually restart the CMS containers to restore the content. To do so, you would run the following from the PowerShell command prompt:
cd c:\Xibo
docker-compose stop
docker-compose start
where \Xibo-docker is the directory you’ve installed the CMS in.