
Xibo for Linux Installation
- Xibo for Android
- DSDevices DSCS9X/95 Set-up Guide
- Install a White Label or a different Player version on DSDevices
- CEC Screen Power on/off with DSDevices
- Hardware Recommendations
- Philips Signage SoC Monitors
- Sony Bravia SoC
- Managing Storage on the Android Device
- Player Settings
- Players without an Internet Connection
- Remote Administration with SS Helper
- Restart Rooted Device with a Shell Command
- Running Xibo for Android
- Resolving Common Issues
- Error shown when I try to licence my Player?
- Player not updating from the CMS?
- I can see my Licence entry but the Player appears unlicensed?
- Error message - Player is missing dependencies
- My scheduled Layouts are not working?
- Layout won't play? Splash screen plays?
- Watchdog error message
- Troubleshooting for Administrators
- Audit Trail
- Log Information
- Player Logs
- Getting the Player Status
- Request Player Status via CMS - Logged in Players only
- Request Player Status directly from a Device
- Can I use the Xibo name / logo?
- Can I run a Xibo Player on Raspberry Pi?
- How can I increase the upload file size limit?
- How do Players communicate with the CMS?
- How many displays can Xibo support?
- How do I reset the Xibo_admin account password?
- Power On/Off for Players
- Testing with Xibo
- Why do I need a Default Layout?
- Xibo for Android FAQ's
- Autoplaying Embedded Youtube Videos
- Closing to Home screen
- Displaying Images
- Embedded TV
- External SD card not listed when running Banana-Pi
- Helper Command to change Time zone
- HTML5 Video
- Memory Notifications
- Menu not accessible
- SSL Support
- Using Portrait Displays
- Video wont play properly
Xibo for Linux Installation
The Xibo for Linux Player is released as a snap package, distributed via snapcraft. This offers a clean, dependency free installation, as well as the potential for automatic upgrades in the future.
There are 4 steps to follow:
- Preparation of the CMS
- Installation of the Player
- Connection of your Player to the CMS
- Authorisation of your Display with the CMS
Prepare your CMS
If you have a 1.8.12 or later CMS, you can connect the Player directly.
Not all of the settings in the Display Settings Profile will work at present, but have been included in readiness for them being fully implemented into the Player.

Installation
To install the Player, simply run:
snap install xibo-player --channel=stable
The Player will be installed without affecting any other software you might have installed on your machine.
You may also visit: https://snapcraft.io/xibo-player or use the button below.

Upgrading from an older release
You can check to see what version of the Player you have installed by running:
snap list
You should see an entry in the output like this:
Name                  Version         Rev   Tracking  Publisher     Notes
xibo-player           1.8-beta1       16    beta      xibosignage   -
To upgrade from the 1.8-alpha6 or later release, run:
snap refresh xibo-player --channel=beta
You may find that snapcraft has automatically upgraded your xibo-player snap.
You cannot upgrade to 1.8-alpha6 from older alphas, so if you previously installed 0.3.3a, 0.4a or 0.5a and haven’t removed it, then run:
snap remove xibo-player-test
After removing the older release, continue to install the Xibo Player.
Connect to the CMS
Newly installed Players must be configured and registered with the Xibo CMS before they can be used using the Player Options.
Player Options
Most of the Player options are set on the CMS and delivered over the network to the Player. This keeps the Player configuration to a minimum on each new installation.
-
To run the Player select Xibo Linux Player from the desktop/app drawer or open a terminal and run:
xibo-player
If running for the first time, an options form will open asking for your CMS details. Before any options can be sent from the CMS it is necessary to register the Display with the CMS instance. This can be done by completing the necessary fields using the Connect tab as pictured below:
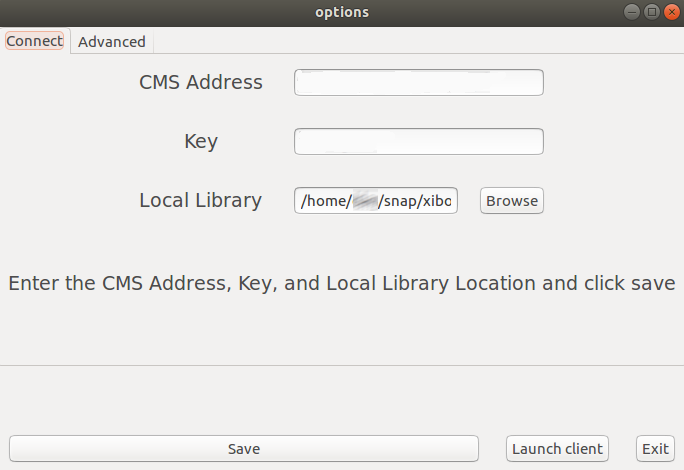
-
CMS Address: This is the fully qualified address of your CMS installation. For example
https://cms.example.org or http://example.org/cms - Key: The secret CMS Key that will authenticate the Display with the CMS.
-
Local Library: Please choose an appropriate local library for the Player to store its files.
-
On the Advanced tab a unique Display ID has been generated for you.
-
Once all the above fields have been completed, click to Save.
The Player will register with the CMS:
- Press Exit to quit
- Launch the Player again.
xibo-player.options.
Display Authorisation
Before the Player can receive Scheduled Events and display Layouts/Campaigns you will need to Authorise the Display to connect to the CMS.
-
Click on Display Admin from the Player Options window or log in to the CMS and select Displays from the main CMS menu to see your newly registered Player in the list.
-
Use the row menu for this Player and select Authorise from the drop down menu.
-
Click Yes to confirm the authorisation of this Display.
Display Setting Profiles
Once registered, the Player will be given a default Display Setting Profile. For further information see the Display Settings section.
Launch Xibo Player
You can now launch the Player from the Player Options.
You should see the Xibo Splash Screen while the Default Layout and its media contents (and anything else you have scheduled) are downloaded. The Player will then begin playing Layout content.
Uninstalling
You can safely delete the files the Player created in your temporary directory, and if you want to remove the Player from your system, simply run:
snap remove xibo-player
