Display Settings
Displays can be configured automatically from the CMS once they are connected and managed using Display Setting Profiles.
Each Display has a default Display Setting Profile which can be customised by an Administrator to suit required preferences.
New Display Setting Profiles can be created and assigned directly to a Display.
A list of available profiles can be viewed from Display Settings under the Display section of the main menu.

Each profile has a Name, Type and a flag indicating if it is the default or not. Default profiles are automatically assigned to Displays of the corresponding type.
Editing Profiles
Use the row menu for the Profile you wish to view and click on Edit. Use the Edit Profile form to adjust available settings.
Each setting is explained under each form field for each of the tabs.
Using the row menu click on Copy to make another version of a Profile. Make adjustments as needed to quickly and simply create new Profiles.
Notable Settings
Collect Interval
Located on the General tab, use the drop-down menu select how often you would like the Player to check for new content. This means that once a Player has communicated with the CMS, it will check again for any changes by the time set here.
Scenario:
A Player has a collect interval set for 24 hours, it will check for any changes, action pending changes and then wait for the next 24-hour collection. If a change is made between this period of time, the Player will not be aware of it until it is time to check again.
If a Display Profile for a Player is changed, the Player will only be aware of the change after it has connected according to its prior connection interval.
Scenario:
A Player with a collect interval set for 24 hours made a check at 12 pm, it will not check again until 12 pm the following day for any changes that have been made. Once the 24 hour interval has passed, it will update the new changes and from this point will collect changes based on the new Profile.
XMR is configured by default with Xibo Cloud Hosting which allows for changes to be communicated immediately to the Player, regardless of the Collection Interval set. This means that fast and dynamic modifications can be made to your Display, without the need to modify a Display Profile.
For non-cloud customers the CMS can be configured to talk to an XMR instance if player actions are required, please contact your Administrator.
We recommend setting no lower than 5 minutes for production, generally a 15-30 minute setting would be sensible.
Enable Stats Reporting
Tick/untick the box to enable/disable the collection of statistics for Proof of Play Reports for all Displays that use the selected Display Profile.
If enabled set the required level of collection for Proof of Play statistics to be applied to all Layouts / Media and Widget items using the Aggregation level drop down.

- Individual - statistics are collected when specified by default.
- Hourly - statistics will be collected hourly by default.
- Daily - statistics will be collected daily by default.
From v2.3.9 if the geolocation of the Display is known, enable the checkbox to record the location against each proof of play record. Users with mobile Displays can turn this setting on if desired.
Players aggregate ‘completed records’ only, with collection made at the end of the Widgets duration so if a Widget has a duration of 3 hours, the stat will be recorded once the Widget has expired.
Download and Update windows
Located on the Network tab, set a time window for Downloads from the CMS and Updates to the Player.

Download window timings
- Select Start and End times to connect to the CMS and download any changes that have been made.
If you make changes to content outside of the download window set, the Player will not be able to download any changes and could cause the Player to show the assigned default Layout or Splash screen instead.
Leave at the Default 00:00 - 00:00 to leave the window as always open!
Update window timings
- Select Start and End times to install any application updates.
Define a time to download updates to a Player, such as new Player versions. This will also include any new or changes to existing schedules to be updated to the Player. Changes to content will NOT be updated during the set Update window timings set.
This setting is best used in conjunction with either assigned Layouts or deferred published Layouts so that they publish during the update window!
Force HTTPS - available from v2.0.0
This option has been included to force a Displays connection to the CMS using HTTPS.
Use the checkbox to Force HTTPS on the Network tab of the Edit Profile form.
This option can be overridden for individual Displays.
Operating Hours - available from v2.2.0
Set Operating Hours for Displays by setting pre-defined Dayparts
-
Use the Network tab for Windows, Android and Linux Players, and the General tab for webOS and Tizen Players.
-
Use the drop down menu to select the day part to apply.
‘Email alerts’ such as those which send when a Display is offline, will not be sent outside of the specified Operating Hours.
Expire Modified Layouts
Located on the Advanced tab, use this checkbox to tell Xibo to immediately expire and cut playback of a Layout when a Player receives an update from the CMS.
Useful for Layouts with long durations!
Use Multiple Decoders (Android Players)
From v2 R207, Gapless Playback with Video content requires an Android device to have multiple decoders. This setting can be found on the Advanced tab and will use the Device Default automatically.
Should an issue arise with playback, set to On!
Enable Touch capabilities on the device (Android Players)
From v3 R300, go to the Advanced tab and enable this option if the device will be used as a touch screen.
Enabling this option will show a one time message on the Player which will need to be manually dismissed!
When left disabled, touching the screen will show the action bar according to the Action Bar Mode option.
Add a Profile
Click on the Add Profile button, and include a name and select Display Type, Save.
The Edit Profile form will open so that you can complete the necessary form fields for this Profile.
Deleting Profiles
Display profiles can be deleted by using the row menu options for a selected Profile.
Please ensure that there is one default remaining for each Type.
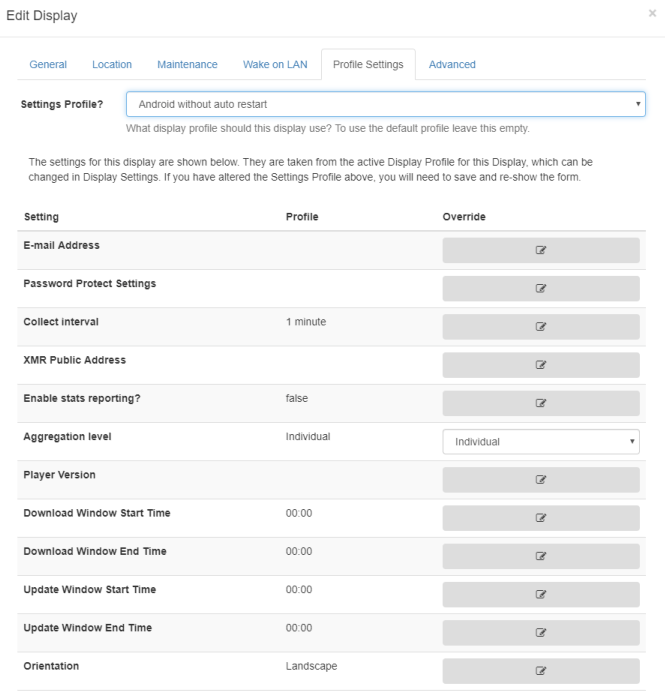
Setting on the Display
A default profile will automatically apply its settings to all Displays of the same Type. A Display can be overridden with a Profile other than the default by selecting the required Settings Profile on a Display’s Edit form using the Profile Settings tab. Each setting can also be overridden to suit individual Displays.