
DSDevices DSCS9X/95 Set-up Guide
- Xibo for Android
- DSDevices DSCS9X/95 Set-up Guide
- Install a White Label or a different Player version on DSDevices
- CEC Screen Power on/off with DSDevices
- Hardware Recommendations
- Philips Signage SoC Monitors
- Sony Bravia SoC
- Managing Storage on the Android Device
- Player Settings
- Players without an Internet Connection
- Remote Administration with SS Helper
- Restart Rooted Device with a Shell Command
- Running Xibo for Android
- Resolving Common Issues
- Error shown when I try to licence my Player?
- Player not updating from the CMS?
- I can see my Licence entry but the Player appears unlicensed?
- Error message - Player is missing dependencies
- My scheduled Layouts are not working?
- Layout won't play? Splash screen plays?
- Watchdog error message
- Troubleshooting for Administrators
- Audit Trail
- Log Information
- Player Logs
- Getting the Player Status
- Request Player Status via CMS - Logged in Players only
- Request Player Status directly from a Device
- Can I use the Xibo name / logo?
- Can I run a Xibo Player on Raspberry Pi?
- How can I increase the upload file size limit?
- How do Players communicate with the CMS?
- How many displays can Xibo support?
- How do I reset the Xibo_admin account password?
- Power On/Off for Players
- Testing with Xibo
- Why do I need a Default Layout?
- Xibo for Android FAQ's
- Autoplaying Embedded Youtube Videos
- Closing to Home screen
- Displaying Images
- Embedded TV
- External SD card not listed when running Banana-Pi
- Helper Command to change Time zone
- HTML5 Video
- Memory Notifications
- Menu not accessible
- SSL Support
- Using Portrait Displays
- Video wont play properly
On this page
DSDevices DSCS9X/95 Set-up Guide
If you are already on a Plan, there is no separate licensing requirement.

Follow these steps to get your DSDevices DSCS9X/95 media player up and running:
- Connect the device to your Display using the supplied HDMI cable.
- Connect power to the device.
- Connect a USB mouse to the device to aid with the set-up.
- Connect to your local network using a wired or Wi-Fi connection:
Wired Connection
- Pug in the ethernet/LAN cable into the port on the back of the device.
Wi-Fi Connection
-
Select the Settings app (cog icon).
-
Choose Network and Internet from the menu.
-
Set the Wi-Fi option to On.
-
Choose the network from the Available Networks section and enter the password for the network to establish a connection.

- Check Date/Time and Timezone settings are correctly set on the device:
- Select the Settings app (cog icon).
- Choose Device Properties from the menu.
- Select Date & Time.
- Set Automatic Date & Time, so that the device will set the correct date and time when an internet connection is established or set manually.
-
If you need to apply a Xibo for Android White Label to your player, follow this guide here.
-
Open Xibo in the app drawer and Connect the device to the CMS by using one of the two methods available below:
Use Code
- Click on Use Code to show a 6 character Activation Code. Ensure that the form remains open until you have entered the code in your Displays administration page and the Player launches automatically. Closing this form will hide the code and will stop the configuration.
- In the CMS navigate to the Displays page and click on the Add Display (Code) button at the top of the page.

- Enter the Activation Code as shown on the Player screen.
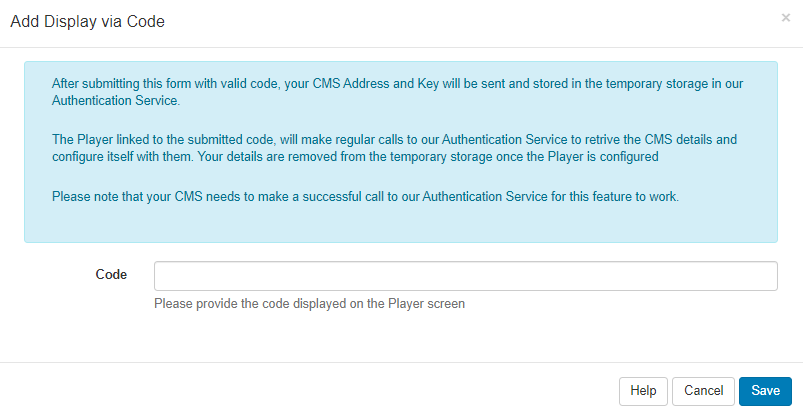
- Save.
Once successfully configured, the Activate Player page will automatically close.
The Display will be registered and awaiting authorisation.
Manual Configuration
- CMS Address - Enter the fully qualified address of your CMS installation. For example https://cms.example.org or http://example.org/cms
- CMS Key - The secret Key that will authenticate this Display with the CMS.
- Connect CMS - A message will be shown for the first successful connection, “Display is registered and awaiting authorisation from an administrator in the CMS”.
Assuming there are no errors with the communication between the CMS and the Player, the Display will be registered and awaiting authorisation.
- Log into your CMS and select Displays from the main CMS menu.
- Use the row menu for the newly connected Player and select Authorise.
- Click Yes to confirm the authorisation of this Display.
-
Activate your licence from the 3 dot menu button in the top right of the device and use the Configuration Menu to click on Connect.
-
Confirm your CMS address and CMS Key and click Connect.
-
If you are on a Plan, Xibo will start to download content from the CMS.
-
If you are not on a Plan and have purchased a Xibo for Android Licence separately you will need to provide the Licence Code for a Licence Pool. This can be done by adding a Licence Pool Code to a Display Setting Profile in the CMS.
-
If no code has been provided in a Display Setting Profile, you will be taken to a page asking for this information to be completed.
-
Once activated, Xibo will start to download content from the CMS.
The Xibo for Android player comes pre-installed. If you need to install a different version / upgrade to the latest version, select the Upgrade Instructions appropriate for you version.
